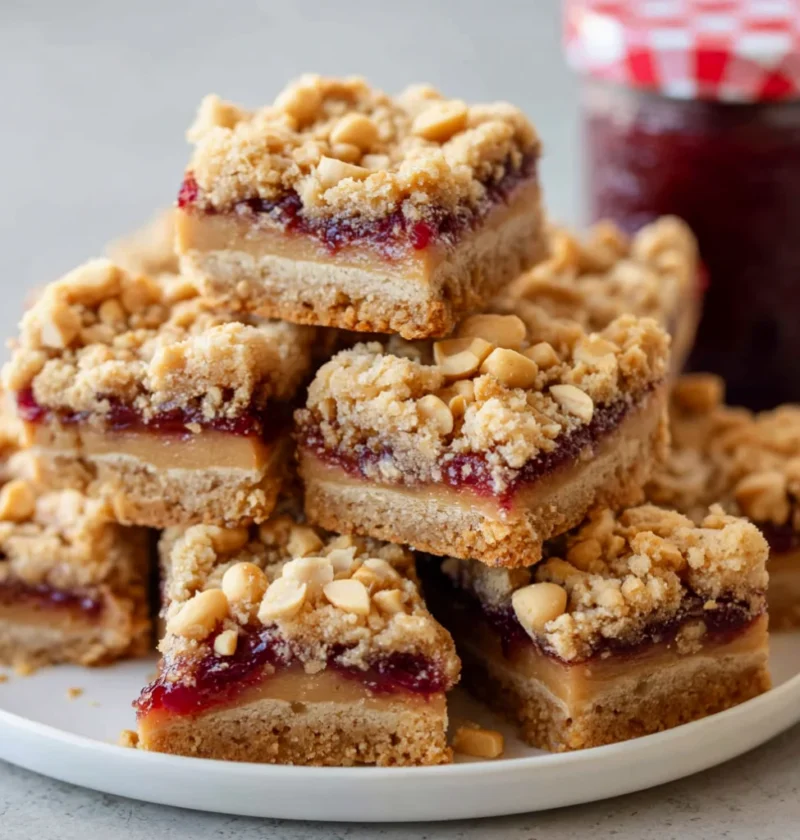
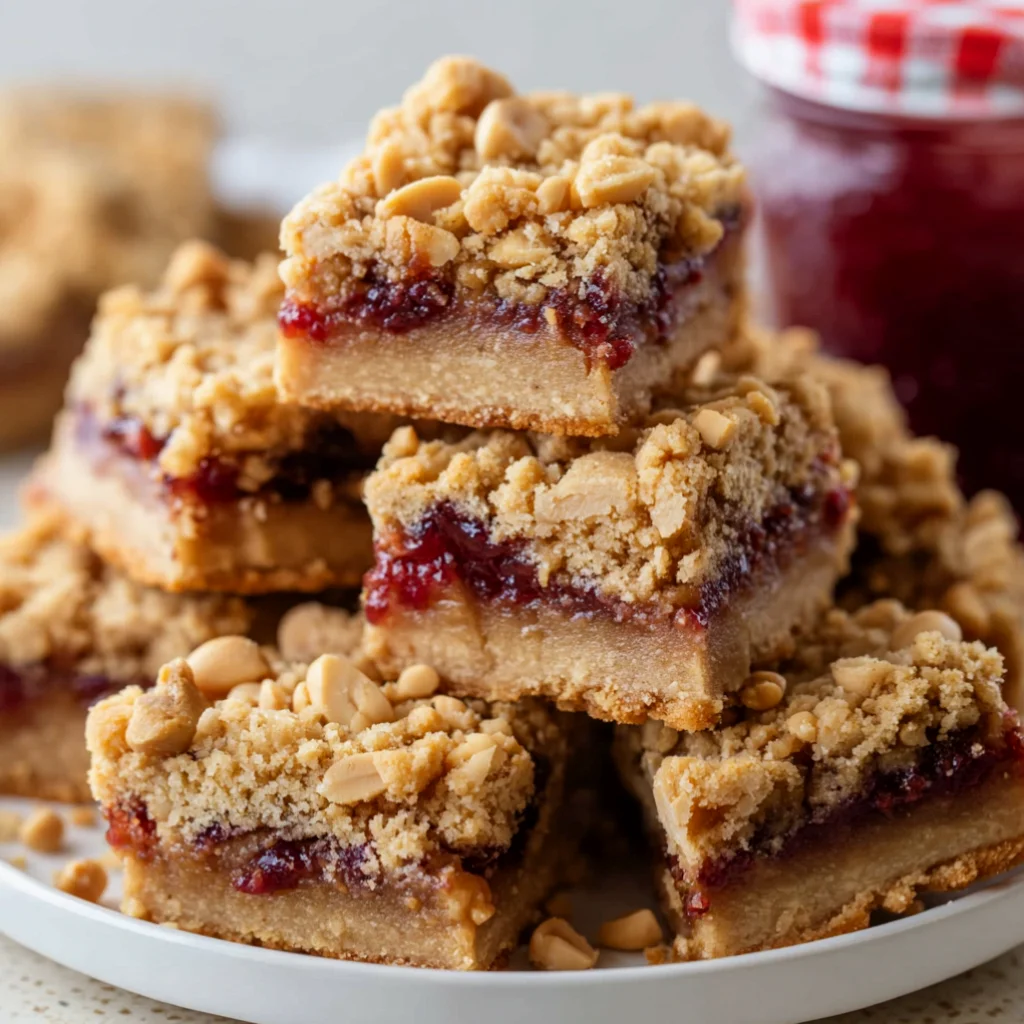
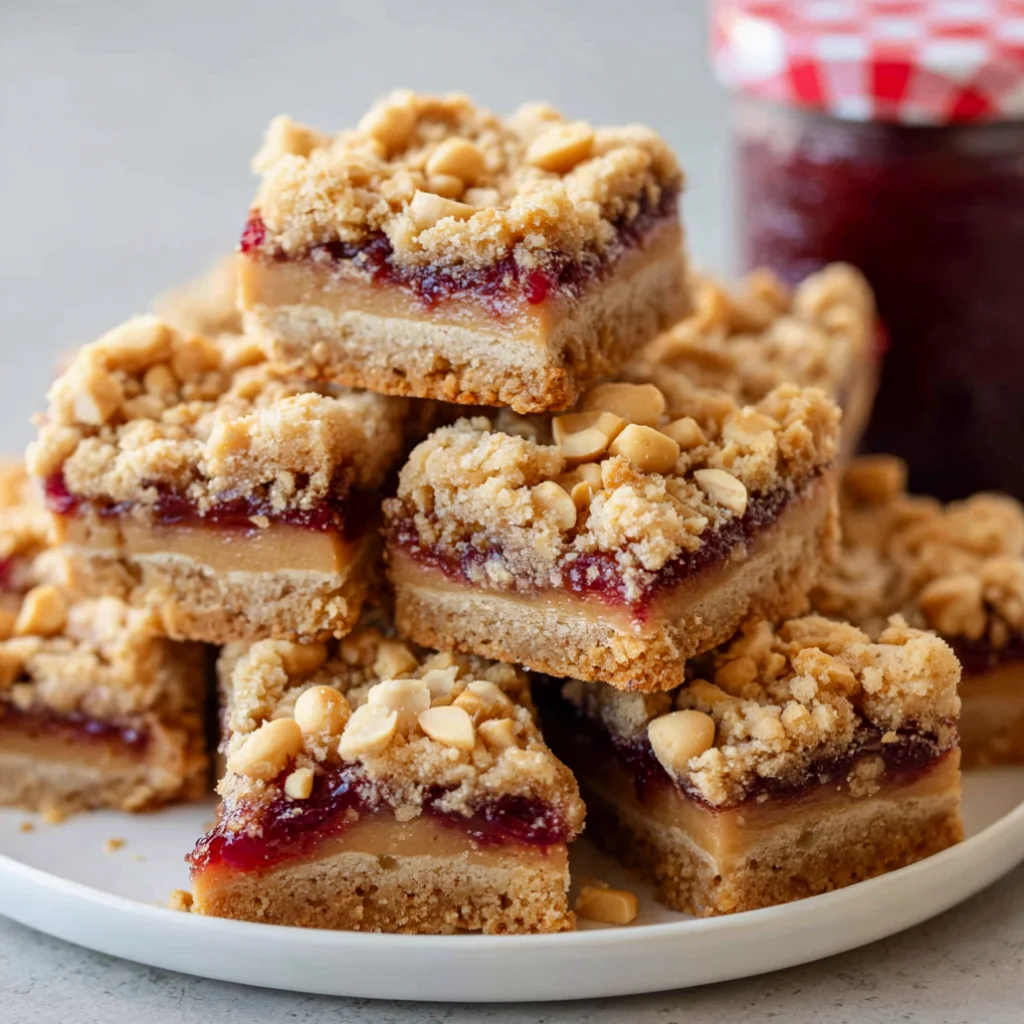
Peanut Butter and Jelly Bars are a delightful twist on the classic combination of two beloved childhood favorites. These bars combine the creamy richness of peanut butter with the sweet, fruity flavor of jelly, creating a dessert that encapsulates nostalgia and satisfaction in every bite. Perfect for lunchboxes, after-school snacks, or just a quick treat, these bars are not only delicious but also easy to make. The beauty of this recipe lies in its simplicity and the universal appeal of peanut butter and jelly, making it an ideal option for both kids and adults alike. A little history reveals that the combination of peanut butter and jelly gained popularity in the United States during the early 20th century, evolving into an iconic staple that many cherish.
Ingredients
- Dry Ingredients:
- 1 ½ cups all-purpose flour
- 1 cup rolled oats
- 1 teaspoon baking powder
- ½ teaspoon baking soda
- ½ teaspoon salt
- Wet Ingredients:
- ¾ cup creamy peanut butter
- ½ cup granulated sugar
- ½ cup brown sugar, packed
- 1 teaspoon vanilla extract
- 2 large eggs
- ½ cup jelly or jam of your choice (e.g., grape, strawberry)
For the best flavor, opt for high-quality peanut butter, preferably natural or organic, and all-natural fruit preserves that are free from artificial additives. You can also substitute the jelly with your favorite fruit spread or even a homemade version for a more personalized touch. If you prefer, consider using low-sugar or no-sugar-added varieties to accommodate different dietary needs. You can learn more about this topic.
Steps / Instructions
- Preheat your oven to 350°F (175°C). Grease and line a 9×9-inch baking pan with parchment paper, leaving an overhang for easy removal. This ensures the bars lift out smoothly after baking.
- In a large mixing bowl, combine the flour, oats, baking powder, baking soda, and salt. Stir until well mixed, ensuring there are no lumps in the dry mixture.
- In another bowl, mix the creamy peanut butter, granulated sugar, brown sugar, and vanilla extract. Beat in the eggs one at a time until the mixture is smooth and creamy. The mixture should be well combined and slightly thick.
- Gradually add the dry ingredients to the wet ingredients, stirring until just combined. Be careful not to overmix, as this can lead to denser bars. Aim for a thick batter that holds together well.
- Pour half of the batter into the prepared baking pan, spreading it evenly across the bottom. Use a spatula to smooth it out completely.
- Carefully spread the jelly or jam over the batter, leaving a small border around the edges to prevent it from seeping out during baking. This layer adds a delightful flavor contrast.
- Top with the remaining batter, spreading it gently over the jelly layer. It’s okay if some jelly peeks through; this adds to the visual appeal.
- Bake in your preheated oven for 25-30 minutes, or until the top is golden brown and a toothpick inserted in the center comes out clean. The edges should look slightly crisp while the center remains soft.
- Once baked, remove from the oven and let cool in the pan for about 10-15 minutes. Then lift out using the parchment overhang and allow to cool completely on a wire rack before cutting into bars. This cooling step helps the bars set up nicely.
Tips & Tricks
To ensure your Peanut Butter and Jelly Bars are perfect every time, consider the following tips: Check out our related guide for more tips.
- For a firmer texture, refrigerate the bars for at least an hour before slicing, which makes cutting easier and prevents excessive crumbling.
- Store leftovers in an airtight container at room temperature for up to 5 days, or in the fridge for up to a week. This helps maintain their moisture and flavor.
- If you’re short on time, you can prepare the batter in advance and bake it on a busy day for a quick dessert idea that the whole family will love.
- Avoid overbaking, as this will lead to dry bars. Keep an eye on them as they approach the 25-minute mark, checking frequently to achieve the perfect texture.
Variations
Feel free to get creative with your Peanut Butter and Jelly Bars! Here are a few ideas:
- Swap the jelly for chocolate spread for a rich, indulgent treat. You might even layer both for a unique combination.
- For a healthier version, substitute half the flour with almond flour and use natural sweeteners such as honey or maple syrup instead of refined sugar.
- Mix in some chopped nuts or chocolate chips into the batter for extra texture and flavor. Options like peanuts, walnuts, or dark chocolate chips work wonderfully.
- Experiment with different flavor combinations, such as honey or maple syrup in place of sugar, to enhance the natural sweetness.
Serving Suggestions
These bars are perfect on their own, but you can elevate your serving experience by:
- Pairing with a glass of milk for a classic comfort food experience that complements the sweetness.
- Dusting with powdered sugar for a decorative touch that adds a little elegance to your treat.
- Serving alongside fresh fruit for a pop of color and freshness, which can contrast beautifully with the rich flavor of the bars.
FAQ
Can I make these bars vegan? Yes! You can substitute the eggs with flax eggs and use a plant-based peanut butter to create a delicious vegan version.
What type of jelly works best? Any jelly or jam will work, but fruit spreads without artificial ingredients tend to be the most flavorful, enhancing the overall taste of the bars.
Can you freeze these bars? Absolutely! Freeze them in individual portions, wrapped tightly, for a quick, healthy snack whenever you want. Just thaw before enjoying!
Conclusion
These Peanut Butter and Jelly Bars are sure to become a staple in your dessert repertoire. With their delightful flavors and simple preparation, they’re perfect for any occasion. Whether for a school lunch treat or a quick after-school snack, give this recipe a try and enjoy the sweet taste of nostalgia! You’ll find that every bite brings back cherished memories, making it a recipe worth sharing with family and friends.
Peanut Butter and Jelly Bars
Peanut Butter and Jelly Bars are a delightful twist on the classic combination of two beloved childhood favorites. These bars combine the creamy richness of peanut butter with the sweet, fruity flavor of jelly, creating a dessert that encapsulates nostalgia and satisfaction in every bite.
Ingredients
- 1 ½ cups all-purpose flour
- 1 cup rolled oats
- 1 teaspoon baking powder
- ½ teaspoon baking soda
- ½ teaspoon salt
- ¾ cup creamy peanut butter
- ½ cup granulated sugar
- ½ cup brown sugar, packed
- 1 teaspoon vanilla extract
- 2 large eggs
- ½ cup jelly or jam of your choice (e.g., grape, strawberry)
Directions
Preheat your oven to 350°F (175°C). Grease and line a 9x9-inch baking pan with parchment paper, leaving an overhang for easy removal.
In a large mixing bowl, combine the flour, oats, baking powder, baking soda, and salt. Stir until well mixed.
In another bowl, mix the creamy peanut butter, granulated sugar, brown sugar, and vanilla extract. Beat in the eggs one at a time until the mixture is smooth and creamy.
Gradually add the dry ingredients to the wet ingredients, stirring until just combined.
Pour half of the batter into the prepared baking pan and spread it evenly across the bottom.
Spread the jelly or jam over the batter, leaving a small border around the edges.
Top with the remaining batter, spreading it gently over the jelly layer.
Bake in the preheated oven for 25-30 minutes, or until the top is golden brown.
Once baked, remove from the oven and let cool in the pan for about 10-15 minutes. Then lift out using the parchment overhang and allow to cool completely on a wire rack before cutting into bars.
Nutrition Facts
Recipe Reviews
- ★★★★★
Excellent recipe!
Leave a Reply
Your email address will not be published. Required fields are marked *


Excellent recipe!