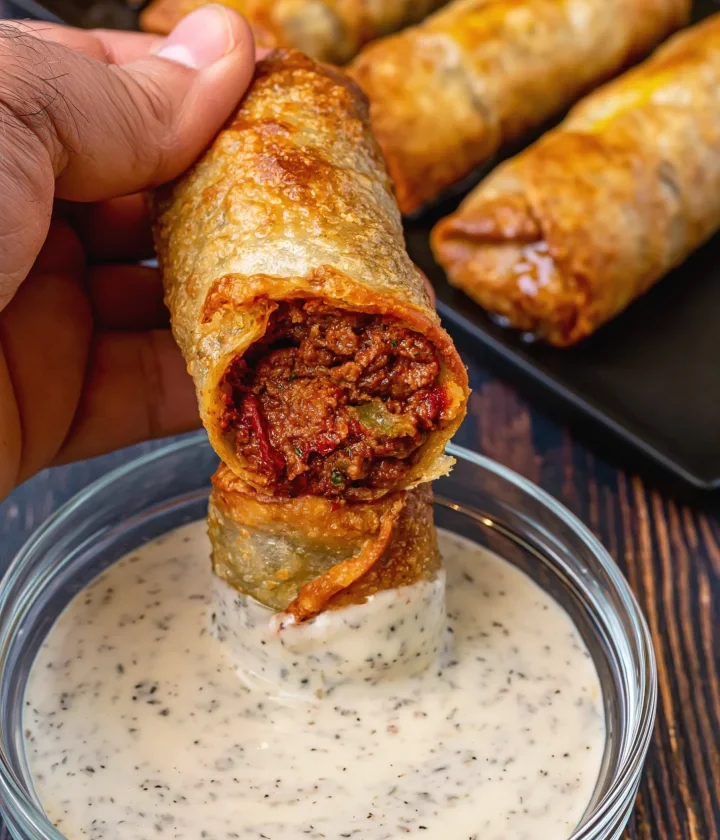
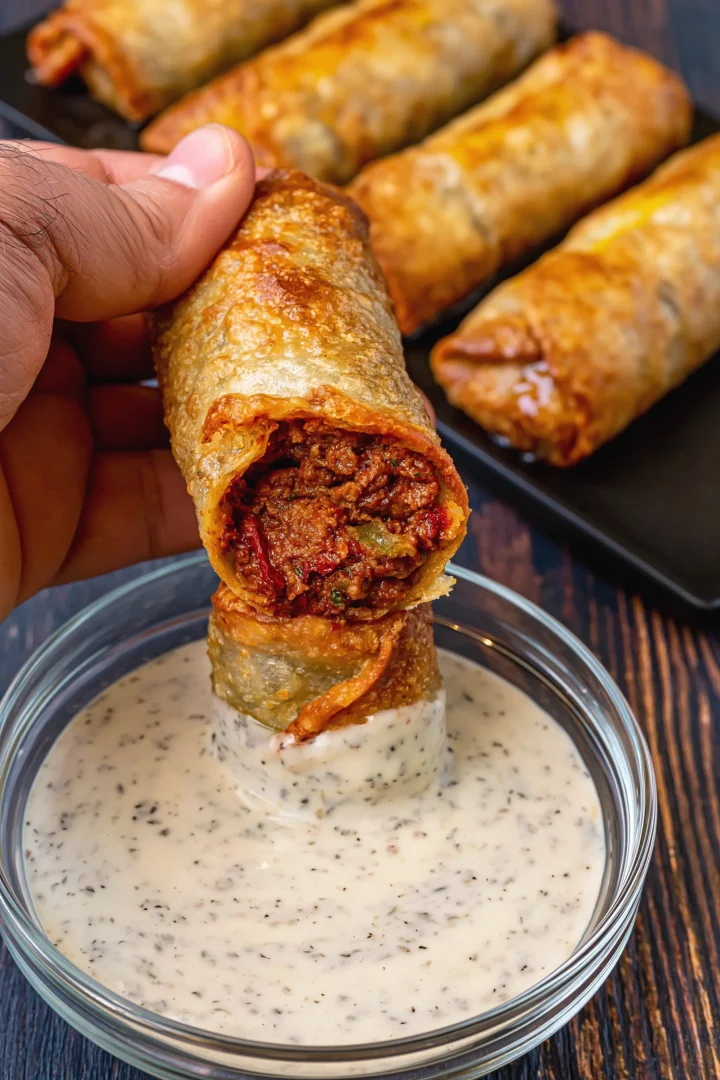
If you’re looking for a delicious way to enjoy pizza while packing in protein, the high protein pizza burrito is the perfect solution. This innovative dish combines the beloved flavors of pizza with the convenience of a burrito, making it not only a crowd-pleaser but also a healthy option for busy weeknights or meal prep. Imagine biting into a crispy tortilla filled with a savory blend of cheese, meat, and your favorite pizza toppings. This recipe is not just a meal; it’s an experience that brings together two culinary worlds in a delightful fusion! The versatility of this dish allows for various ingredient combinations, making it suitable for everyone’s taste preferences and dietary needs. With the rising popularity of high-protein diets, this high protein pizza burrito fits seamlessly into health-focused lifestyles without sacrificing flavor.
Ingredients
- For the burrito:
- 4 large whole wheat tortillas (or gluten-free tortillas for a gluten-free alternative); ensure they are pliable and soft for easier rolling, which helps prevent tearing during assembly.
- 1 cup cooked chicken breast, shredded (or ground turkey for a different protein); feel free to use leftover rotisserie chicken for added flavor. Grilling or baking beforehand can enhance the taste further.
- 1 cup shredded mozzarella cheese; opt for part-skim mozzarella to reduce fat while maintaining creaminess, or try low-fat options that still melt beautifully.
- 1/2 cup pizza sauce; choose a robust sauce with flavorful herbs for an extra kick; homemade versions can be tailored to your taste with more garlic or spices.
- 1/4 cup grated Parmesan cheese; freshly grated will enhance the flavor, offering a richer taste compared to pre-grated options.
- 1/2 teaspoon Italian seasoning; for a more distinct flavor, consider using fresh herbs like oregano and basil, which provide vibrant notes.
- 1/4 teaspoon garlic powder; fresh minced garlic can be used for a more intense flavor, enhancing the overall aroma of the burrito.
- 1/4 teaspoon crushed red pepper flakes (optional); adjust according to your heat preference, or substitute with a dash of hot sauce for added zest.
- Optional toppings:
- 1/2 cup sliced black olives; they offer a savory component that complements the dish, adding saltiness and contrasting texture.
- 1/2 cup bell peppers, diced; add vibrant colors and crunch, and you can mix different colors for visual appeal.
- 1/4 cup red onion, thinly sliced; provides a sharp contrast to the creamy cheese, balancing the flavors wonderfully.
- Fresh basil or parsley for garnish; adds freshness and a pop of color, elevating the visual presentation of your dish.
Steps / Instructions
- Preheat your oven to 400°F (200°C) to prepare for baking the burritos. This temperature ensures the tortillas become crispy while the fillings heat through, creating a beautiful gold crust.
- In a mixing bowl, combine the shredded chicken, mozzarella cheese, pizza sauce, Parmesan cheese, Italian seasoning, garlic powder, and crushed red pepper flakes. Mix until everything is well incorporated, ensuring the sauce coats all the ingredients for maximum flavor. This thorough mixing ensures that every bite is equally delicious.
- Lay out a tortilla on a clean surface. Spoon about 1/4 of the filling mixture into the center of the tortilla, being careful not to overfill to avoid spillage. This helps maintain structure when rolling.
- Sprinkle any optional toppings, such as olives, bell peppers, or onions, on top of the filling. Feel free to get creative with your toppings based on your preferences! Mixing different toppings can create exciting new flavors.
- Fold the sides of the tortilla over the filling, then roll it up tightly from the bottom to create a burrito shape. Ensure all fillings are tightly secured inside by rolling firmly but gently, being cautious not to rip the tortilla.
- Repeat the process with the remaining tortillas and filling mixture, placing each burrito seam-side down to help them stay closed during cooking. This positioning also aids in achieving even crispiness.
- Place the burritos seam-side down on a baking sheet lined with parchment paper. This prevents sticking and makes for easy cleanup, allowing you to enjoy your meal without hassle.
- Bake in the preheated oven for about 15-20 minutes, or until the tortillas are crispy and golden brown. Keep an eye on them to achieve your desired level of crispiness, as oven temperatures can vary.
- Remove from the oven and let cool for a few minutes. Garnish with fresh herbs if desired, elevating the dish’s presentation while enhancing the overall flavor.
Tips & Tricks
- For the crispiest texture, ensure your burritos are well-sealed and placed seam-side down on the baking sheet. This will help them maintain their shape and prevent leaking, ensuring a clean presentation.
- If you want to prepare these burritos ahead of time, assemble them without baking, wrap them tightly in aluminum foil, and store them in the freezer. Bake directly from the freezer, adding an extra 5-10 minutes to the cooking time for perfect results, which is ideal for meal prep.
- Experiment with different types of cheese for a unique flavor profile – try pepper jack for a spicy kick or gouda for a creamy texture! Mixing cheeses can elevate the richness of the burrito, making it even more indulgent.
- Use a pizza cutter to slice your burritos in half for a fun presentation, revealing the cheesy, delicious filling. This makes them perfect for sharing or serving at parties, where guests can easily grab a slice.
Conclusion
There you have it! A high protein pizza burrito that is not only easy to make but also utterly delicious. This dish strikes the perfect balance between the comforting flavors of pizza and the convenient and satisfying format of a burrito. Perfect for meal prep or a quick lunch, this recipe is sure to impress. Don’t forget to share your creations with friends and family! You can learn more about this topic.
High Protein Pizza Burrito
A delicious way to enjoy pizza while packing in protein, this innovative dish combines the beloved flavors of pizza with the convenience of a burrito.
Ingredients
- 4 large whole wheat tortillas (or gluten-free tortillas for a gluten-free alternative)
- 1 cup cooked chicken breast, shredded (or ground turkey)
- 1 cup shredded mozzarella cheese
- 1/2 cup pizza sauce
- 1/4 cup grated Parmesan cheese
- 1/2 teaspoon Italian seasoning
- 1/4 teaspoon garlic powder
- 1/4 teaspoon crushed red pepper flakes (optional)
- 1/2 cup sliced black olives (optional)
- 1/2 cup bell peppers, diced (optional)
- 1/4 cup red onion, thinly sliced (optional)
- Fresh basil or parsley for garnish (optional)
Directions
Preheat your oven to 400°F (200°C).
In a mixing bowl, combine the shredded chicken, mozzarella cheese, pizza sauce, Parmesan cheese, Italian seasoning, garlic powder, and crushed red pepper flakes. Mix until well incorporated.
Lay out a tortilla on a clean surface. Spoon about 1/4 of the filling mixture into the center of the tortilla.
Sprinkle any optional toppings on top of the filling.
Fold the sides of the tortilla over the filling, then roll it up tightly from the bottom.
Repeat with the remaining tortillas and filling mixture, placing each burrito seam-side down.
Place the burritos seam-side down on a baking sheet lined with parchment paper.
Bake in the preheated oven for about 15-20 minutes, or until crispy and golden brown.
Remove from the oven and let cool for a few minutes. Garnish with fresh herbs if desired.
Recipe Reviews
- ★★★★★
Excellent recipe!
Leave a Reply
Your email address will not be published. Required fields are marked *


Excellent recipe!